Out of Phase: Race Conditions and Shared Mutexes


This is part of a series for the Out of Phase game project that reflects on various stages, covering pros and cons of the creative process and implementation of the game.

Last year I started porting over the backend of my game from Python to C++. The reason for this move ties into my long-term goals as a game developer. Programming a multiplayer server has been something that has intrigued me for a while. The idea of creating a virtual environment that is continuously running and allows multiple players to interact with that environment in real time is fascinating to me.

At this time, my game will only support two players, but I would like to play around with adding more.  I’m doubtful this will be a massively multiplayer game, like World of Warcraft or Elder Scrolls Online, since that would be a huge amount of effort. So maybe up to four players.

Real-time games that support multiple players typically require some special handling of synchronizing the game state as it is updated from the player’s clients. Without synchronizing, race conditions will occur which will result in erroneous and unpredictable ways.

So in this post, I’ll be covering how to avoid race conditions in C++ threads by using locks and mutexes.

Race Conditions

Let’s take a code snippet as an example (this is make believe pseudo code):

void attackGoblin(Monster* goblin) {
    int health = goblin->getHealth();
    health -= 10;
    goblin->setHealth(health);
}

Race Condition 1

Ok. So the problem here is what happens when two players are attacking this goblin at the same time. Just because this code is wrapped in a function, doesn’t mean each block of code gets executed sequentially. It’s possible that the lines of code being run between each player may be executed in a mixed order.

Let’s assume that goblin->getHealth  and goblin->setHealth  read and write the current health value from or to memory. (But they don’t use synchronization)

Two players are attacking a goblin with 500 health. Both players inflict 30 damage at the same time. We expect the goblin’s health to drop down to 440, but instead, it only drops down to 470. What happened?

(thread 1) int health = goblin->getHealth(); // getHealth returns 500
(thread 1) health -= 30; // local to thread 1
(thread 2) int health = goblin->getHealth(); // getHealth() returns 500
(thread 2) health -= 30; // local to thread 2
(thread 2) goblin->setHealth(health); // Goblin health is now 470
(thread 1) goblin->setHealth(health); // Goblin health is still 470

Where did the damage go? Well, it got overwritten because the instructions weren’t synchronized. Each thread keeps a separate copy of health and when the goblin’s health is changed in one of the threads, it never updates in the other.
Using SQLite in a Threaded Java App


A few months ago I decided to port my WoW data importer app from PHP to Java because the website was already built in Java. I also wanted to see if execution time could be improved in a multi-threaded app.

The PHP script stores the JSON returned from the WoW API into individual JSON files for each item. This means there are thousands of JSON cache files. There’s a second script that packs these responses into a single file, and then a third script that imports the data from the consolidated file in the second script.

The reason for this two-step process was to see the difference in time it took my script to process the individual files vs a consolidated file, as describe in my blog post on optimizing the PHP importer script.

This approach was overcomplicated and pretty inefficient. While writing the Java app, I wanted to create a cache source that didn’t require another script to pack the data, but was could be updated efficiently.

Choosing SQLite

At first, I tried Oracle BerkleyDB. Coding that up was pretty simple, and I got it working. However, I couldn’t find a good program to manage the BerkleyDB. The apps I came across either wasn’t specifically for BerkleyDBs or they required compiling, and I didn’t want to bother with that.

Since I’ve used SQLite in quite a few projects, it seemed like the next choice. While the mySQL database I’m putting the data into would have worked fine, that database could be remote, and I needed a local database to cache the API results into.

Threading Gotchas

A big challenge with SQLite is that you’re working directly with a file, and not a service like you do with mySQL. Because of this, special precautions need to be taken so that you don’t run into SQLITE_BUSY exceptions or accidentally corrupt your database by writing in two threads at once. This happened at least once while I was playing around with different configurations.

Tip #1: Share the SQLite connection between threads

Creating a shared connection should at least avoid corrupting the database. However, it’s still possible to come across the SQLITE_BUSY exception

Tip #2: Use a Lock

Sharing the connection worked very well at first. I was able to import data into a clean database without any problem. However, when the app was run again and started updated cache, I started running into SQLITE_BUSY exceptions.

Data Importer Optimizations


Nobody wants a slow application. Efficiently optimizing your application takes experience and constraint. You don’t want to prematurely optimize, but you also don’t want to code something subpar that will contribute to your technical debt and put your app in the grave early.

There is a balance that needs to be struck. Knowing when and how to optimize needs to become second nature so that it doesn’t interfere with the development workflow. Producing something so that it can be demonstrated often is more important than optimizing in many cases.

This post will cover a few optimization techniques associated to reading from files and running SQL queries. These tests are written in PHP, an interpreted language, though the techniques can be applied to other languages as well.

The Script

The program is basically a data importer. It takes item data from the World of Warcraft API and updates a mySQL database. Before this script runs, the Warcraft JSON data is saved in a single file delimited by a newline character. This single file, which acts as a cache, allows me to focus on optimizing the local operations without network overhead.

XDebug Setup

XDebug for PHP has a useful profiling feature. When profiling is enabled, XDebug will store the profiling data in the directory specified, and the file can be read with KCacheGrind (Linux) or WinCachGrind (Windows).

[xdebug]
xdebug.profiler_enable=1
xdebug.profiler_output_dir=\Users\Justin\Misc Code\Profiling\php7

Optimizations and Tests

The complete dataset consists of 99,353 records. There are empty records which take up a newline, so the text file contains 127,000 lines.

Base Test

(Link)

I started off with a PHP script that was purposely designed to be slow. Each item was stored in its own cache file.

For each item:

  • Open the item specific data file
  • Check if there is JSON data (move onto next line of JSON if none)
  • Parse JSON
  • Query database for existing record
  • Execute insert if no existing record
  • Execute update if record exists

This took 2 hours and 37 mins. This is absolutely horrible. The good news is there are quite a few things that can be optimized here.

Here is one thing to keep in mind in regards to speed, the closer your data is stored to the processor, the faster it can be processed.

CPU Cache < Memory < Hard Drive < Local Daemon < Network/Internet.

RPG Slots Progress – Cocos2d Review


rpgslots

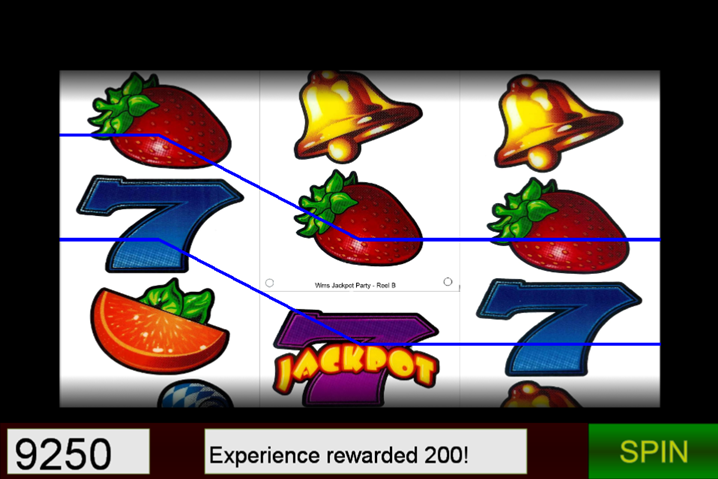
I started developing a slots game using the Cocos2d C++ SDK. Cocos2d is an opensource game development framework that support C++, Objective-C, and JavaScript. Eventually, this game will evolve into a slots RPG, like King Cashing and King Cashing 2. For now it uses a pretty generic reels and a match 3 mechanic that matches on the same row as well as cells on adjacent rows. For score, it keeps experience points, since this will transition to the RPG slots.

Source for the project can be found here. As of this writing, it’s in early development.

Like many game frameworks, Cocos2d has many helper functions that allow for quick game prototyping. Scenes are easy to construct, and assets, sprites, and audio can be added using built in Cocos2d objects. It even supports the ability to add custom shaders.

Extending Sprites

I found quickly that I needed to create custom objects that extended sprites. In this project there two classes that extend cocos2d::sprite ; the reel, and the HUD.

Grouping elements within sprites helped with organizing code and separation of concern. I did run into strange memory errors when trying to add certain objects, such as cocos2d::Label , directly to the scene while also having a pointer to it in the scene.

Autorelease

The Cocos2d C++ framework uses a smart-pointer technique to automatically destroy dynamically allocated objects when its internal reference count is 0. This relieves pressure in remembering to destroy objects and worrying about pointer ownership. Though cyclical dependencies still need to be avoided.

The built-in Cocos2d objects are automatically added to the autorelease pool, so there is no need to use the new  keyword. In my project, I have an object that extends the Cocos2d sprite. So there’s some boilerplate code that I needed to add so my object would be added to the autorelease pool.

ReelSprite* ReelSprite::create(const std::string& filename, std::vector<int> _cells)
{
    ReelSprite* mainSprite = new ReelSprite();

    mainSprite->init(filename);
    mainSprite->autorelease(); // <-- ADD TO AUTORELEASE POOL
    mainSprite->cells = _cells;

    return mainSprite;
}

ReelSprite::create  is a static method that follows the Cocos2d convention of constructing an object and adding it to the autorelease pool. mainSprite->autorelease()  is the line that actually adds the object to the autorelease pool, so that it does not have to be manually destroyed.

Screen View to World Coordinates


I needed a map editor with more features than what I saw included in TILED back in August, so I decided to try my own hand at creating a map editor. It’s just an interactive grid, right? Not quite. At least in the approach I took.

I started writing the tile editor with C++ and SDL. Implementing drag functionality was pretty easy since that was baked in the SDL API, however, I didn’t want to build the UI widgets from scratch. Unfortunately, the existing UIs I found weren’t compatible with SDL, so I had to pivot and use straight OpenGL and matrix math.

Because I was ditching the SDL framework, I had to implement my own drag logic, which is what I will discuss in this post.

Moving Objects with Mouse Picking

I needed the ability to select objects in 3D space, which lead me to a technique called mouse picking. This technique utilizes ray casting, which is how you detect if a line (a ray) intersects with something else.

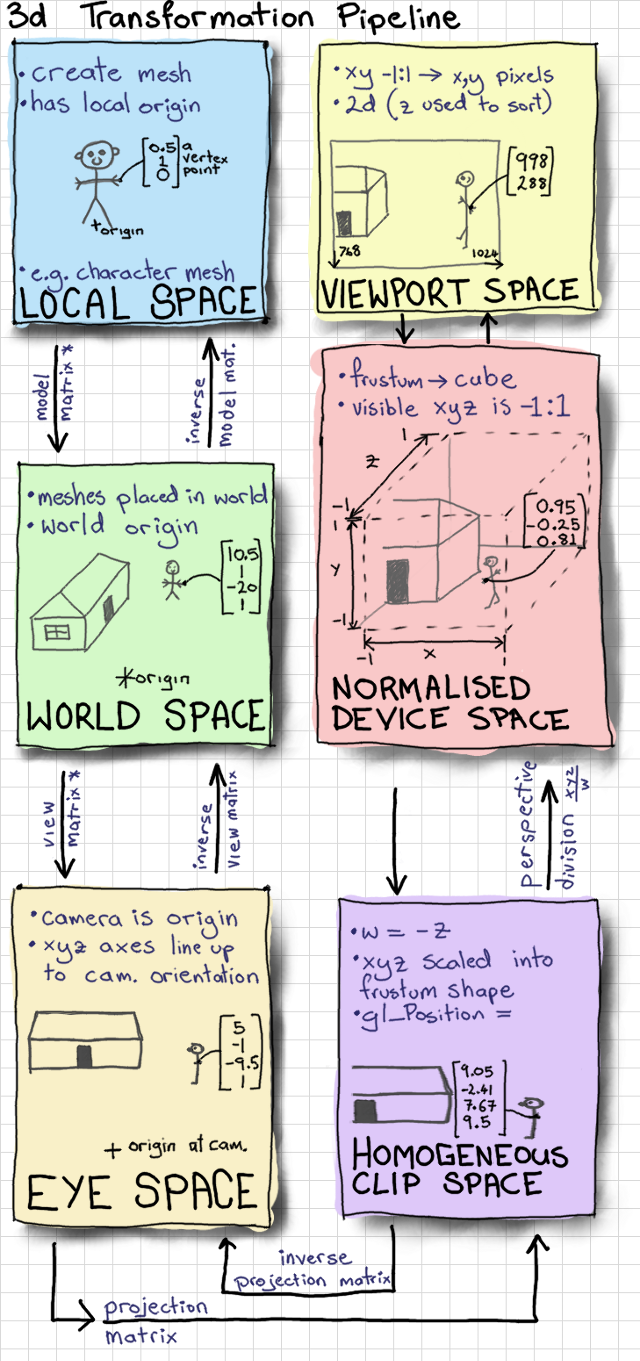
The article “Mouse Picking with Ray Casting” by Anton Gerdelan helped explain the different planes/spaces and what they represented.

In order to move the objects in 3D space at a distance that matched the mouse movement, I had to transform the coordinates between screen and world spaces. When working with 3D coordinates, there are several spaces or planes that have their own coordinates.

A very simplified list of these spaces are:
Screen Space > Projection (Eye) Space > World Space > Model Space.

newtranspipe
Anton Gerdelan’s Mouse Picking with Ray Casting

Fully understanding the transformation formula was a challenge for me. Normalization and calculating the inverse Projection Matrix tripped me up due to a combination of confusion and erroneous input.

The Solution

Here are some code examples of the final working solution.

Initialization of Projection, View, Model

Projection = glm::perspective(1.0f, 4.0f / 3.0f, 1.0f, 1024.1f);
GlobalProjection = Projection;

CameraDistance = 10.0f;
GlobalCameraDistance = CameraDistance;

View = glm::lookAt(
glm::vec3(0, 0, CameraDistance), // Camera location
glm::vec3(0, 0, 0), // Where camera is looking
glm::vec3(0, 1, 0) // Camera head is facing up
);
GlobalView = View;

Model = glm::mat4(1.0f);
GlobalModel = Model;

MVP = Projection * View * Model; // Matrix multiplication

View to World Coordinate Transformation
// SCREEN SPACE: mouse_x and mouse_y are screen space
glm::vec3 Application::viewToWorldCoordTransform(int mouse_x, int mouse_y) {
    // NORMALISED DEVICE SPACE
    double x = 2.0 * mouse_x / WINDOW_WIDTH - 1;
    double y = 2.0 * mouse_y / WINDOW_HEIGHT - 1;

    // HOMOGENEOUS SPACE
    glm::vec4 screenPos = glm::vec4(x, -y, -1.0f, 1.0f);

    // Projection/Eye Space
    glm::mat4 ProjectView = GlobalProjection * GlobalView;
    glm::mat4 viewProjectionInverse = inverse(ProjectView);

    glm::vec4 worldPos = viewProjectionInverse * screenPos;
    return glm::vec3(worldPos);
}

At first this algorithm felt a bit magical to me. There were things going on I wasn’t entirely wrapping my head around, and when I stepped through the algorithm I got lost at the inverse matrix multiplication. In addition, the “Mouse Picking” article normalizes the world space values, which we don’t need.