Fetching Data with async/await in a React Component


Fetching data from a resource, such as a JSON API is a common thing these days, and so is the use of asynchronous (async) functions that avoid locking up applications.

In React components, async functions have some additional caveats to keep in mind that –if left unchecked– can introduce memory leaks or race conditions.

In this article, we’ll be covering a small app that fetches articles from an API and lists them out. We’ll take a look at async functions in a React component, address caveats, and checkout making our function reusable as a custom React hook.

This article will cover:
πŸ’š Async/Await use in a React component
πŸ’š Writing cleaner code with custom hooks
πŸ’š Testing async/await in Jest πŸ‘©β€πŸ”¬

Prerequisites
βœ” Familiar with functional React component basics
βœ” Basic understanding of async/await

Getting More Familiar with Docker


I’ve been spending this week getting more familiar with Docker. I’ve learned how to build new images, spin up a collection of related containers with Docker Compose, and push an image to AWS.

I’m pretty excited about how this will help my team, but I’m also nervous about the unknowns we’ll encounter. My goal is to free up time, not take up more.

It’s important to know what Docker is and isn’t. To be honest, I’m still a little fuzzy. I wrote about this in my last post.

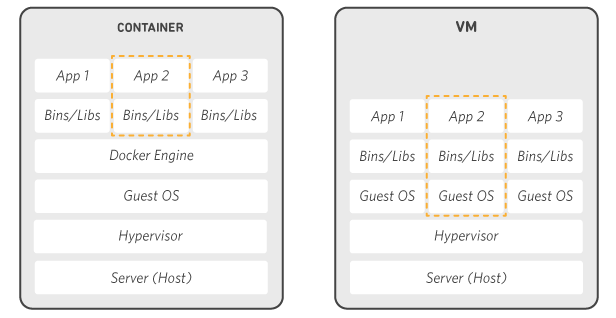
Docker utilizes virtualization technology to run processes in isolated environments called Containers. It has some similarities to virtual machine technology, such as VMWare and VirtualBox.

Docker Containers do not hold an OS, but they do have libraries and binaries from other OSes.

After working with Docker a little, I’m now much familiar with commands to setup a container and access the container (docker exec -it is my friend). I’ve also gotten more familiar with docker-compose (docker-compose up/down are pretty cool).

The documentation for Drupal on Docker provides info on both setting up Drupal and MySQl.

I’ve been able to spin up a Redis and MySQL server with Docker, it has simplified the setup and given my team a consistent toolset.

What is this Docker Nonsense?


This last week I’ve been working on getting Drupal running through NGINX so I can test out a page builder feature. I was getting a weird error with the dev-server built into PHP.

I didn’t want to have NGINX running on Windows, so I spun up a VM. Setting up an environment can be time consuming and sharing content between host and client is a bit of a pain.

The last two weeks has had a theme: environment/tools setup. So my mind has been on “how do we improve this process?”

Documenting the process helped a little, but it is still a time consuming process. It also seems like there’s always some new gotchas that eat up time. If only there was a way to automate this…

Here is where Docker enters the picture and where it’s suppose to shine. We can create a group of containers that run a web server, database, and other needed services. This setup can be shared across workstations so we maintain a consistent work environment. We can also use Docker in production too with Amazon’s ECS (Elastic Container Service).

It sounds like a smart move and everyone is on board.

Great, now let’s tear down this idea and look at use cases and scenarios, starting with security.

But in order to feel out security we need to know what Docker is. That can be a little confusing. To be honest, I’m still a bit fuzzy.

My understanding is a Docker container is a very thin layer that can have libs and executables. When you run the container the processes run in their own isolated namespaces.

This diagram is the most helpful of everything I’ve come across.

A* Pathfinding In Game


I wrote a post on implementing a simple A* Pathfinding algorithm a couple months ago. When I went to add it to my game I ran into some interesting differences I wanted to write an update on.

Here is the algorithm working on my game server. Both player and NPC are red blocks. When the player is within viewable range of the NPC, the NPC will start chasing it.

The pathfinding algorithm allows the NPC to maneuver around blocked tiles.

Coordinate to Tile Mapping

One thing I discovered while incorporating it into my game was my simple example had a 1:1 coordinates to tile ratio. Coordinates 0,0 was the first tile, and 0,1 was the second tile. When tiles were 16×16 pixels, the coordinate to index mapping broke.

To address this, I needed to pass  map width and map height in tiles, as well as the tile size so it was known when a new row started and the bounds of the map.

I did this by creating a map struct that contained the width, height, size, and pointer to the tile vector.

struct GameMap {
	GameMap() {}
	GameMap(int _map_width, int _map_height, int _tile_size, std::vector<unsigned int>* _tiles) : map_width(_map_width), map_height(_map_height), tile_size(_tile_size), tiles(_tiles) {}
	int map_width = 0;
	int map_height = 0;
	int tile_size = 0;
	std::vector<unsigned int>* tiles;
};

A Simple A* Pathfinding Algorithm


Pathfinding is a fundamental tool commonly used to move characters around a map intelligently. Here I will be going over the A* algorithm written in C++.

It’s important to visualize how the pathfinding algorithms search for the most efficient path. Here is a neat demo using a JavaScript library called Pathfinding.js. By playing with Pathfinder.js, you should notice that the algorithm first tries to go straight for the end point and only when it hits a blocked node will it look for nodes that follow a less direct path.

The Algorithm

In a nutshell, the A* algorithm uses a graph of nodes that have a weight associated to them used to weigh paths from the start node to the end node.

What weight represents is arbitrary, since A* can be applied to different scenarios. For navigating through a map of squares for example, this value could be based on distance and steps taken. The algorithm processes neighboring nodes, adding all neighbors to an “open list” and then moving on to the lowest cost node in that list.

Given the open list begins with the start node (opposed to be empty), the main loop of the algorithm looks like this:

  1. Get next node from open list (now known as current node)
  2. Skip node if in closed list or out of bounds
  3. Add current node to closed list
  4. Remove current node from open list
  5. Process neighboring nodes (North, West, South, East)
    1. Set current node as parent of neighbor if weight is less

In all, the algorithm uses three lists:

  • Open List:Β  Keeps track of which nodes to search next and is ordered by weight
  • Closed List: Al nodes that have already been searched
  • Path: Linked list that connects the end node to the start node

To clarify on the path, there are actually multiple paths that exist because less efficient paths may be found before the most efficient path. The end node will have the final path, and that is all we care about.

Implementation

Next we’ll go over the structures and functions involved with this algorithm. One core structure is the node.

Node Structure

As mentioned before, this is implemented in C++ and the graph is comprised of nodes.

Here is the Node structure with only its members:

struct Node {
    int x;
    int y;
    int index = 0;
    int distance;
    bool blocked = 0;
    int weight = 0;
    Node *parent = NULL;
};

I use indices to keep track of nodes. This includes determining which node is the start and end, as well as which nodes have already been processed (closed list) and which nodes should be processed next (open list).

Note: The index Β struct member is there for convenience, so a coordinate to index lookup doesn’t need to be run every time.

The path list mentioned before is a linked list created through the parentΒ  struct member, which points to another node.

Grid and List Structures

Nodes are stored as pointers in a vector. The open list is implemented as a multiset with the comparison function, NodeComp, so sorting is automatically done. Lastly, the closed list is implemented as a vector of ints that stores the indexes.

typedef std::multiset<Node*, NodeComp> NodeList; // So we don't need to type out the full definition everywhere

NodeList open_list; // Node pointers to process
std::vector<int> closed_list; // Node indices already processed
std::vector<Node*> grid; // All nodes