An Introduction to React


I’ve been working with React a bit lately and wanted to document my experience and findings. Since there’s quite a few “hello world”/getting started guides out there already, I’ll provide links to those and cover key points I took away from articles and experience.

When React was announced around mid-2013, it looked like an interesting concept and seemed like it should be pretty significant considering it was being maintained by Facebook. However, it fell off my radar soon after. as It was too early to use in any of my projects. Looking at where React stands now in addition to supporting libraries, I can see  that the scene has matured and stabilized quite a bit.

What is React?

React is a JavaScript library created by Facebook that fulfills the functionality of the view in MV*C. It stands by itself and aligns with the “single responsibility” principle that is the first of the five S.O.L.I.D object-oriented programming and design principles. Other concerns such as routing, controller, and model/stores are separate patterns that exist outside of React.

Because of this separation, React can fit into other frameworks or be pieced together with other libraries to make a complete MV*C framework, such as Flux (see which Flux implementation should I use on history/development of Flux), Redux, or Cerebral.

React is designed to be scalable and fast. Some patterns like its root level event listener are intended to make React fast, and other features, such as the virtual DOM, use encapsulation to reduce or eliminate common problems with scaled web applications caused by conflicting class/ID names and DOM manipulation side effects.

Also worth noting, React was split into react-dom and  react-native to independently support browser and mobile apps. For this article, I’ll be covering what is referred to as react-dom, which is React for the browser.

Learning Curve

Working with React and its ecosystem has been interesting. Given you’re already familiar with JavaScript, React itself isn’t that difficult to comprehend. Though it does take some time to understand the concepts React is founded on and what problems it is addressing. For example, the data flow design may take some time to get used to.

The challenges with React more lie in the ecosystem, when third-party libraries and the build process come into play. However, the libraries are worth getting familiar with, and the build process should become less confusing as things settle down. For now, there are plenty of boilerplate start projects on github.

Getting Started

The first step is to take it easy and not get overwhelmed. There are a collection of technologies that make a React stack, and they don’t have to be learned at once, I recommend first focusing on React and JSX first. By understanding the core concepts and working with plain React is a good start.

React’s homepage goes over the fundamentals of building a React app from scratch without diving too far into the tool chain. A starter kit can be downloaded from their getting started guide.

Most examples require compiling the HTML like markup called JSX into JavaScript. This can be done through a browser version of the Babel library called Babel Standalone. However I’ve found this makes debugging difficult, because I can’t set accurate breakpoints. Compiling the application outside of the browser as part of the build process is recommended.

The following is a simple “Hello World” component defined with a pure function. For components that don’t hold state (covered further down), pure functions are preferred over react factories, such as React.createClass or React.createComponent.

See the Pen React Hello World by Justin Osterholt (@hattraz) on CodePen.0

Out of Phase: Genre Considerations


This is part of a series for the Out of Phase game project that reflects on various stages, covering pros and cons of the creative process and implementation of the game. The first post can be found here.

Deciding what type of game you’re creating can be difficult while the concept is in its infancy. There’s so many ideas you want to use, and many of those may conflict with each other at first, requiring some compromise in order for them to gel

In Out of Phase, there was a struggle to combine puzzle and action mechanics.I was trying to integrate elements from the two genres that I knew were successful by themselves, but incompatible with each other. To resolve this, I had to consider what experience I wanted to give the player and how the mechanics from each genre would contribute to that experience.

Some ideas I had to let go of, as they were too far from the vision, and other ideas had to be reworked to fit the core game concept. Here’s a reflection of that journey.

Puzzles

First I’ll start off with what kind of puzzler this is not, but what I originally thought it was going to be.

Some of my favorite games are point-and-click puzzlers, such as Myst or Escape the Room games such as Crimson Room. In these types of games, the player can progress at their leisure. While there may be action sequences, they usually don’t require interaction from the player, though there are some exceptions where the player must make a timed decision during the action sequence. The timing is typically pretty lax however.

Games like Myst, Crimson Room, or even The 7th Guest are what I would consider leisure puzzlers. They are typically slower paced compared to an action game and focus more on immersion and an experience. Death in these games are pretty rare, and are based off of a decision and not action, so the player is given a high level of safety while exploring the worlds. The focus of these games is on immersing the player into a fantasy world, and death or abrupt twitch mechanics tend to draw the player out.

While these games are fun, they weren’t the style I was looking for. Instead, I wanted to go with something more real time and physical, like Maniac Mansion or the more recent Ib. I wanted to give the player a different feeling of tension that they may need to react fast to avoid getting injured or killed, which deviated from leisure puzzlers.

This was a point of conflict in my early design brainstorming, because I liked the pacing and immersion of the leisure puzzlers. However, every time I tried to settle on removing action from the game, it felt incomplete. So I moved onto a different type of puzzler, one which was more physical and time sensitive.

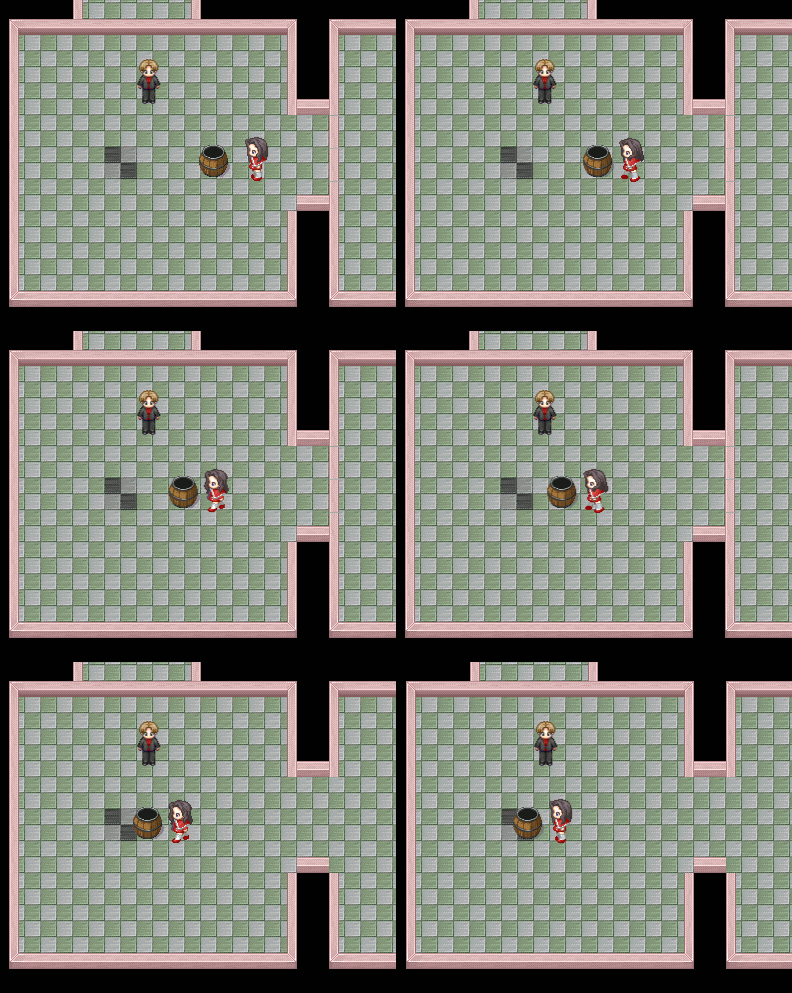
In the first prototype I started with a very basic series of chambers and hallways that contain puzzles. This is what was implemented at the the Global Game Jam, and I had the beginnings of what was like a Portal clone, with pressure plates and objects that could be pushed onto them.

oop_barrel2

Where it differed from Portal (besides no portals!) is some objects and parts of the maps would be different between the players, in some cases requiring the players to communicate and discover the difference in order to complete the puzzle.

There would be furnished rooms with interactive objects, like a record player that would play music, light switches, and paintings. The player would need to interact with certain objects and in some cases complete a sequence in order to progress through the game.

With these ideas, this game was becoming more like Ib, where core gameplay involved adventuring through the levels and discovery. There would be some action sequences, but the player had to evade dangers, opposed to attacking those dangers.

The game concept already sounded fun, and there were so many possibilities for puzzles. Yet, there were some things that didn’t feel right. I didn’t want the player to be totally defenseless, I wanted to let them fight back. I also needed something that gave the game some replay value after the puzzles were figured out, so my focus began to shift.

Out of Phase: Global Game Jam 2015


This is the first post in a series that will reflect on the project from various stages, covering pros and cons of the creative process and implementation of the game. This review is a long time coming, it was originally started right after the 2015 Global Game Jam.

In January I broke a lull by participating in the annual 48 hour Global Game Jam. Prior to this jam, it had been some time since prototyping a game of my own. Game jams in general are a great opportunity to break creators block and start fresh.

I started a project called Out of Phase. The original idea was to create a two player game that involved a series of puzzles contained within chambers, similar to Portal 2. There was a twist, where the environment was slightly different between the two players, requiring them to communicate between each other to solve the puzzles.

At the end of the 48 hour jam, I produced the first version. While not complete, it still gave an example of the general concept with a couple puzzle examples. Two players were supported through a local co-op mode, where chracters were toggled by hitting the tab key.

For this post, I’ll give a general overview of the tools and design ideas that took place at the Global Game Jam.

Framework

It’s a good rule of thumb in game jams not to build your own framework. Your focus is on producing a game, not a toolset. Phaser.io is a real snazzy HTML5 game engine/framework. It comes with a tilemap loader, collision detection, WebGL support, and a plethora of other goodies to make life easier.

Another guideline with jams is to know your toolset so that you’re not wasting time figuring out how to use the tools. I only had a little experience with Phaser.io prior to the jam, so I didn’t follow this one completely. However being very experienced with JavaScript and the concepts that Phaser.io is built on, I was able to get started very quickly and iterate through ideas easily.

One problem I ran into early on was selecting the wrong physics engine for collision detection. This set me back a little, but helped me learn the differences between the P2 and Arcade systems. In Phaser.io, you can actually have more than one system active, so they’re not exclusive to each other.

Keep your server running with monitoring services


In a world of 99.999% up time, keeping a service running is a big deal. How do you compete? That is where monitoring and automated server management comes into play.

It is a good idea to use both a local and remote monitoring solutions, with the remote service being a fail-safe that will send out a notification when a website or service  is unreachable or has poor latency.

With remote monitoring, there are many options that will scale to different needs. For example, I use 24×7 by Zoho for basic port monitoring. This service will send a notification if an app is no longer reachable from the internet. There are many monitoring services out there, so it would be worthwhile to search around and compare.

The next step is something that runs locally, has more granular monitoring, and will take actions to resolve a problem when it is detected. Monnit will do just this. It is a daemon that runs on the server and monitors resources and processes. It has the ability to restart programs and send notifications under specific conditions, such as when memory or CPU consumption exceeds a given threshold, and low disk space. It can also detect a continually failing applications by tracking the PID.

Here are some configuration examples of monnit for Apache, MySQL, and SOLR. Comments have been added to describe what they do. Each example uses an alert directive, which requires a recipient to be configured. This is done by setting the following in the config file:

set alert example@email.com

APACHE

## Custom Apache2 setup
check process apache2 with pidfile /var/run/apache2.pid
group www
start program = "/etc/init.d/apache2 start"
stop program = "/etc/init.d/apache2 stop"

# Send alert if Apache isn't listening to specified port
if failed host localhost port 80 then alert

# Restart daemon if children processes > 250
if children > 250 then restart

# Alert if load avg stays high with given criteria
if loadavg(5min) greater than 80 for 8 cycles then alert

# Stop trying to restart daemon if restarts aren't working
if 3 restarts within 5 cycles then timeout

MySQL

## Custom MySQLD setup
check process mysqld with pidfile /var/run/mysqld/mysqld.pid
group root
start program = "/etc/init.d/mysql start"
stop program = "/etc/init.d/mysql stop"

# Send alert if MYSQLD isn't listening to specified port
if failed host localhost port 3306 then alert

SOLR

## SOLR Check
check process solr with pidfile /var/run/solr.pid
group root
start program = "/etc/init.d/solr start"
stop program = "/etc/init.d/solr stop"

# Send alert if SOLR isn't listening to specified port
if failed host localhost port 8983 then alert

# Restart daemon if SOLR isn't listening to specified port
if failed host localhost port 8983 then restart

# Stop trying to restart if restarts aren't working
if 5 restart within 5 cycles then timeout

In each of these, Monnit has at least a check that the app is listening on a designated port. If it is not, a restart of the service is attempted. With Apache, if it is running too many children, the service will be restarted to fix this. (Note: Apache does have a setting in Apache conf that set max children threads that should help avoid triggering the children processes check) In some cases the service will be shutdown if it is running hot for too long.

Conclusion

Keeping a daemon running and gathering information about it before something goes wrong is crucial in maintaining a quality application or service. Monitoring tools like 24×7 and Monnit make this easier and are a must on any IT toolbelt.

Manage Your Daemons With Upstarts


I am finding the need for custom Linux service scripts more and more. This is in the case where a program I want to run in the background does not already have one for one reason or another. Maybe I’m compiling instead of using apt, or sometimes I am creating my own app.

In the past I’ve used the traditional init script format that exists in /etc/init.d. This proved to be tedious. Unless I already had the init script on hand, I would need to code it out in bash script, like so:

#!/bin/bash
#
# Debug SMTP Service
#
case "$1" in
start)
if [ -f "/var/run/debugsmtp.pid" ]
then
    echo "Service already running"
else
    echo "Starting service..."
    python -m smtpd -n -c DebuggingServer localhost:25 &
    echo "$!" > /var/run/debugsmtp.pid
    echo "Service started"
fi
;;
stop)
if [ -f "/var/run/debugsmtp.pid" ]
then
    PID=`cat /var/run/debugsmtp.pid`
    kill -9 "$PID"
    rm /var/run/debugsmtp.pid

if [ ! -f "/var/run/debugsmtp.pid" ]
then
    echo "Service stopped"
fi
else
    echo "Service not running"
fi
;;
*)
echo "Service"
echo $"Usage: $0 {start|stop|status}"
exit 1
esac
exit 0

As you can see, there are sections to handle different commands, in this case it is just start and stop. With other programs there may also be restart, status and reload.

Start checks if the process is already running by checking if a PID file exists. If it does, then the service is assumed to already be running. If not, the script goes on to start the process and stuffs the process ID into a newly created pid file at the same location.

Stop is similar, as in it works on the PID file. It will check if the process is running by checking the pid file, and if it does, it will run a kill command on the process.

Phew.

Setting this up for multiple systems is a pain, and it is more technical than I would like to be doing on a routine basis. Specifically, managing processes with PIDs and using the kill command makes me a little nervous.

But there are other problems I could run into that would run into some shortcomings of init.d. One being the ability to base the daemon’s start on the network interface being up, or the filesystem being ready. This would apply to applications such as web and SMTP servers.

Enter upstart.

Upstart came into play in 2006 (at least in the Ubuntu world). It is a replacement of the previously mentioned init system where scripts are placed in /etc/init.d and /etc/rc*.d folders. It has a more accurate boot sequence through event based start up, and take less effort to implement due to some tasks like PID management being automatically handled.

Upstarts are configured with stanzas.  Two of those being start and stop, where you use runlevels or events (network up, filesystem ready) to define when the daemon should be started and shutdown. When it’s all set it looks like this:

description “nginx http daemon”

# Start daemon when filestyem and network interface is up
start on (filesystem and net-device-up IFACE=lo)

# Stop daemon when runlevel is not specified levels
stop on runlevel [!2345]

# Daemon binary location
env DAEMON=/usr/sbin/nginx

# Daemon pid location
env PID=/var/run/nginx.pid

# Indicate daemon has child processes
expect fork

# Restart if daemon ends prematurely
respawn

# Max respwans
respawn limit 10 5

# Commands to run before daemon starts
pre-start script
$DAEMON -t
if [ $? -ne 0 ]
then exit $?
fi
end script

# Run daemon
exec $DAEMON

Conclusion

So there you have it. Upstarts make life easier by cutting your daemon initialization scripts in half with more control, and less being in the weeds. It’s ideal for custom or compiled applications (packages often install their own init scripts) and removes the need to boot up a daemon every time you start your machine.