RPG Slots Progress – Cocos2d Review


rpgslots

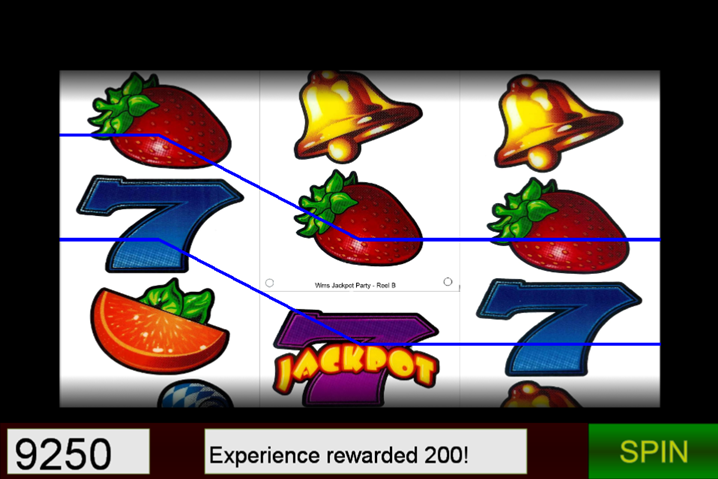
I started developing a slots game using the Cocos2d C++ SDK. Cocos2d is an opensource game development framework that support C++, Objective-C, and JavaScript. Eventually, this game will evolve into a slots RPG, like King Cashing and King Cashing 2. For now it uses a pretty generic reels and a match 3 mechanic that matches on the same row as well as cells on adjacent rows. For score, it keeps experience points, since this will transition to the RPG slots.

Source for the project can be found here. As of this writing, it’s in early development.

Like many game frameworks, Cocos2d has many helper functions that allow for quick game prototyping. Scenes are easy to construct, and assets, sprites, and audio can be added using built in Cocos2d objects. It even supports the ability to add custom shaders.

Extending Sprites

I found quickly that I needed to create custom objects that extended sprites. In this project there two classes that extend cocos2d::sprite ; the reel, and the HUD.

Grouping elements within sprites helped with organizing code and separation of concern. I did run into strange memory errors when trying to add certain objects, such as cocos2d::Label , directly to the scene while also having a pointer to it in the scene.

Autorelease

The Cocos2d C++ framework uses a smart-pointer technique to automatically destroy dynamically allocated objects when its internal reference count is 0. This relieves pressure in remembering to destroy objects and worrying about pointer ownership. Though cyclical dependencies still need to be avoided.

The built-in Cocos2d objects are automatically added to the autorelease pool, so there is no need to use the new  keyword. In my project, I have an object that extends the Cocos2d sprite. So there’s some boilerplate code that I needed to add so my object would be added to the autorelease pool.

ReelSprite* ReelSprite::create(const std::string& filename, std::vector<int> _cells)
{
    ReelSprite* mainSprite = new ReelSprite();

    mainSprite->init(filename);
    mainSprite->autorelease(); // <-- ADD TO AUTORELEASE POOL
    mainSprite->cells = _cells;

    return mainSprite;
}

ReelSprite::create  is a static method that follows the Cocos2d convention of constructing an object and adding it to the autorelease pool. mainSprite->autorelease()  is the line that actually adds the object to the autorelease pool, so that it does not have to be manually destroyed.

Screen View to World Coordinates


I needed a map editor with more features than what I saw included in TILED back in August, so I decided to try my own hand at creating a map editor. It’s just an interactive grid, right? Not quite. At least in the approach I took.

I started writing the tile editor with C++ and SDL. Implementing drag functionality was pretty easy since that was baked in the SDL API, however, I didn’t want to build the UI widgets from scratch. Unfortunately, the existing UIs I found weren’t compatible with SDL, so I had to pivot and use straight OpenGL and matrix math.

Because I was ditching the SDL framework, I had to implement my own drag logic, which is what I will discuss in this post.

Moving Objects with Mouse Picking

I needed the ability to select objects in 3D space, which lead me to a technique called mouse picking. This technique utilizes ray casting, which is how you detect if a line (a ray) intersects with something else.

The article “Mouse Picking with Ray Casting” by Anton Gerdelan helped explain the different planes/spaces and what they represented.

In order to move the objects in 3D space at a distance that matched the mouse movement, I had to transform the coordinates between screen and world spaces. When working with 3D coordinates, there are several spaces or planes that have their own coordinates.

A very simplified list of these spaces are:
Screen Space > Projection (Eye) Space > World Space > Model Space.

newtranspipe
Anton Gerdelan’s Mouse Picking with Ray Casting

Fully understanding the transformation formula was a challenge for me. Normalization and calculating the inverse Projection Matrix tripped me up due to a combination of confusion and erroneous input.

The Solution

Here are some code examples of the final working solution.

Initialization of Projection, View, Model

Projection = glm::perspective(1.0f, 4.0f / 3.0f, 1.0f, 1024.1f);
GlobalProjection = Projection;

CameraDistance = 10.0f;
GlobalCameraDistance = CameraDistance;

View = glm::lookAt(
glm::vec3(0, 0, CameraDistance), // Camera location
glm::vec3(0, 0, 0), // Where camera is looking
glm::vec3(0, 1, 0) // Camera head is facing up
);
GlobalView = View;

Model = glm::mat4(1.0f);
GlobalModel = Model;

MVP = Projection * View * Model; // Matrix multiplication

View to World Coordinate Transformation
// SCREEN SPACE: mouse_x and mouse_y are screen space
glm::vec3 Application::viewToWorldCoordTransform(int mouse_x, int mouse_y) {
    // NORMALISED DEVICE SPACE
    double x = 2.0 * mouse_x / WINDOW_WIDTH - 1;
    double y = 2.0 * mouse_y / WINDOW_HEIGHT - 1;

    // HOMOGENEOUS SPACE
    glm::vec4 screenPos = glm::vec4(x, -y, -1.0f, 1.0f);

    // Projection/Eye Space
    glm::mat4 ProjectView = GlobalProjection * GlobalView;
    glm::mat4 viewProjectionInverse = inverse(ProjectView);

    glm::vec4 worldPos = viewProjectionInverse * screenPos;
    return glm::vec3(worldPos);
}

At first this algorithm felt a bit magical to me. There were things going on I wasn’t entirely wrapping my head around, and when I stepped through the algorithm I got lost at the inverse matrix multiplication. In addition, the “Mouse Picking” article normalizes the world space values, which we don’t need.

An Introduction to React


I’ve been working with React a bit lately and wanted to document my experience and findings. Since there’s quite a few “hello world”/getting started guides out there already, I’ll provide links to those and cover key points I took away from articles and experience.

When React was announced around mid-2013, it looked like an interesting concept and seemed like it should be pretty significant considering it was being maintained by Facebook. However, it fell off my radar soon after. as It was too early to use in any of my projects. Looking at where React stands now in addition to supporting libraries, I can see  that the scene has matured and stabilized quite a bit.

What is React?

React is a JavaScript library created by Facebook that fulfills the functionality of the view in MV*C. It stands by itself and aligns with the “single responsibility” principle that is the first of the five S.O.L.I.D object-oriented programming and design principles. Other concerns such as routing, controller, and model/stores are separate patterns that exist outside of React.

Because of this separation, React can fit into other frameworks or be pieced together with other libraries to make a complete MV*C framework, such as Flux (see which Flux implementation should I use on history/development of Flux), Redux, or Cerebral.

React is designed to be scalable and fast. Some patterns like its root level event listener are intended to make React fast, and other features, such as the virtual DOM, use encapsulation to reduce or eliminate common problems with scaled web applications caused by conflicting class/ID names and DOM manipulation side effects.

Also worth noting, React was split into react-dom and  react-native to independently support browser and mobile apps. For this article, I’ll be covering what is referred to as react-dom, which is React for the browser.

Learning Curve

Working with React and its ecosystem has been interesting. Given you’re already familiar with JavaScript, React itself isn’t that difficult to comprehend. Though it does take some time to understand the concepts React is founded on and what problems it is addressing. For example, the data flow design may take some time to get used to.

The challenges with React more lie in the ecosystem, when third-party libraries and the build process come into play. However, the libraries are worth getting familiar with, and the build process should become less confusing as things settle down. For now, there are plenty of boilerplate start projects on github.

Getting Started

The first step is to take it easy and not get overwhelmed. There are a collection of technologies that make a React stack, and they don’t have to be learned at once, I recommend first focusing on React and JSX first. By understanding the core concepts and working with plain React is a good start.

React’s homepage goes over the fundamentals of building a React app from scratch without diving too far into the tool chain. A starter kit can be downloaded from their getting started guide.

Most examples require compiling the HTML like markup called JSX into JavaScript. This can be done through a browser version of the Babel library called Babel Standalone. However I’ve found this makes debugging difficult, because I can’t set accurate breakpoints. Compiling the application outside of the browser as part of the build process is recommended.

The following is a simple “Hello World” component defined with a pure function. For components that don’t hold state (covered further down), pure functions are preferred over react factories, such as React.createClass or React.createComponent.

See the Pen React Hello World by Justin Osterholt (@hattraz) on CodePen.0


Shorthand Javascript Techniques


(This is for coders familiar with the JavaScript language. Information on more basic JavaScript usage can be found at sites like w3schools.com.)

Summary

Keeping code standardized can be made easier through JavaScript shorthand. Here we will be looking at several techniques that will make code more readable, flexible and overall easier to matain.

Declarations
Conditions
Mathematic Operations
Anonymous Functions

Declarations

Variables

Instead of declaring each variable individually, they can be placed on the same line with a comma separating them.

var foo1, foo2, foo3, foo4;

Arrays:

var foo_arr = ['bar1',  'bar2',  'bar3', ' bar4'];
window.alert(foo_arr[0]); //bar1

Objects:

var foo_obj = {name:  'bar', some_prop: 'test'};
window.alert(foo_obj.name); //bar

Conditions

condition? true_logic :  false_logic;

Shorthand conditional statements can be coupled with an assignment, allowing  a single line of code to be used for simple conditional logic.

var foo = bar? 1 : 0;

Assigning a default value when encountering an empty variable (null, undefined, 0, false, empty string) can also be shortened from this

if(foo) {
    bar = foo;
} else {
    bar = 'Default Value';
}

to this

bar = foo || 'Default Value';

Mathematic Operations

Handling math operations can be shorted by using the following syntax:

foo = 5;

foo ++; // Increase by one

foo --; //Decrease by one

foo -= 2; //Decrease by two

foo += 2; //Increase by two

foo *= 3; //Multiply by three

foo /= 2; //Divide by two

Anonymous Functions

Assigning a function to a variable:

var my_func = function() { alert('Hello World') }
my_func;

Inline anonymous functions:

var foo = {
    name: 'bar',
    fnc:  function() {
        alert('Hello World');
    }
};

Common Usage

Combining the use of shorthand results in blocks of code that appear more elegant and easier to read.

var foo = [
    {name: 'apple', prop2: 'test2'},
    {name: 'orange', prop2: 'test2'}
];

Instead of:

function fruit(type, cultivar)
{
    this.type= type;
    this.cultivar = cultivar;
}
var foo = Array(
    new fruit('Apple', 'Fuji'),
    new fruit('Apple', 'Gala')
);

As you can see, using shorthand removes “noise” and reduces the amount of written code, both of which make for easier reading. When rummaging through scripts that contain several hundred lines of code, removing any excess code makes life easier.