Game Jam #4 Takeways


At the end of April I had my first Game Jam with our local Sac Game Jam meetup. It was loads of fun, and a valuable experience. For this jam series, all teams start from the ground up, beginning by deciding on a game concept, mechanics, and then building out the prototype. This is all done within a relatively small period of time (around  6 hours), and at the end we all demo our creations, for better or worse.

My team went with a tug-of-war concept, and we used ActionScript using the Flixel framework.  We consisted of two ActionScript programmers, and a graphic designer. Let me just say, graphic designers are awesome. We were lacking some key equipment, so we restored to taking photos of the hand drawn images using a cellphone. Low tech, but it worked out. The paper cut-outs had a neat look too! In the end we made a mad dash to make things presentable, and while we had something to show, there was more we had wanted to include that didn’t make the cut.

There are many pitfalls that can be encountered throughout the prototyping process which can snare both newbie, and experienced jammer. These traps can be enticing,  often giving the facade of being critically important (“the game will be nothing without this!”), and in some cases of no importance (“we can figure this out later”, “this will be a snap!”). These can be avoided through preparation, planning, and restraint. Here are some tips I’ve gathered from this experience that I found noteworthy and will apply in future jams.

1.) Come prepared, don’t learn the framework at the game jam

There should be a basic understanding of how to use the framework,  not mastery, but some familiarity. The key issue is you don’t want to be spending chunks of time struggling with a mechanic or feature. This will eat up what little time you have like Pacman.

2.) Prototype, quick and dirty

Don’t worry too much about what it looks like, in code or graphically. You’re strapped for time, no one is going to care if it’s all nightmarish spaghetti code (*shudder*). Ya, it would be awesome if you could OOPify things with Player->doSomeAction(enemy), but you may be complicating things, which results in bottlenecks further down the line.  Make everything public, keep it in a single file unless absolutely necessarily.  In addition, don’t worry about animating sprites, or anything like that. This is just a prototype to give the idea of what you’re game will be like. Resort to using colored blocks and shapes if need be. Prototype like the wind!

3.) Start with simple game mechanics

Decide on core mechanics within the first moments of the jam, and keep those mechanics simple. It’s really easy to get carried away with game mechanics and lose sight on your main objective. Mechanics that require conditions and checking (ex. buff/debuff system) should be boiled down to something more manageable so that it doesn’t become a hold up. Even if the mechanics sound too simple, stick with them until it’s been implemented. If they really are that simple, you will have time to expand and add.

4.) Divide up features when working in groups

Working with another programmer adds a layer of trickiness. You now have to be careful of not stepping on the other fellow’s toes. Avoid overlap, and give ownership to features. Break things out logically like movement, item collection, and enemy collision. This is a practice that should be started at the very beginning so that there is a minimal amount of duplication.

5.) Be ready to share your stuff

When working with a group, be sure you have a way to efficiently share code at any time. There are many services out there, such as DropBox, but it doesn’t have to be that fancy. E-mail will work just as well. If you don’t have something setup in advance, resort to what ever is the most effective that doesn’t take long to setup. Advanced forms of code sharing, such as version control (Subversion, Github) may be tempting, but should most likely be avoided due to complications that can arise, such automated merging, and conflicts. From a coders perspective, you should know what is being removed or added.

Conclusion

Well there you go, a handful of pitfalls to watch out for from a great learning experience that was Game Jam #4.  There will be more that I will be sharing as I journal more past and future jams.  The important thing is to keep looking how to improve yourself, and most of all to have fun.

Thanks go out to GameDevRadio.net for their podcast on prototyping (and others).
PHPUnit with YAML


After diving into some database integration testing, I found that my data model was incompatible in a XML format. Using hash tags is a no-no, as it’s against XML specifications. Well darn, what is a coder to do? YAML to the rescue.

First, what is YAML? Besides it being fun to say, it’s a “human friendly data serialization language”. HFDSL doesn’t sound as cool as YAML, and just like PHP, you shouldn’t look to far into the acroymn, less you are fond of infinite loops.

“YAML is a recursive acronym for “YAML Ain’t Markup Language“. Early in its development, YAML was said to mean “Yet Another Markup Language“,[3] but was retronymed to distinguish its purpose as data-oriented, rather than document markup.” – Wikipedia

Fantastic, moving on…

PHPUnit uses YAML as a supported format for creating datasets. Tables, columns, and rows are split up using colons, dashes and spacing to define your database objects. For example, let’s say we have a dataset of books.

books: #table name
- #begin a new record, followed by key: value pair
id: 1
title: Moby Dick
author: Herman Melville
-
id: 2
title: The Hobbit
author: J. R. R. Tolkien

This will add two rows to the table books with its respective data.

YAML can definitely be easier to read in some scenarios, as there is less to read. After using it for a couple months, it has kind of grown on me as well. It is a nice format to use  for config files when XML is overkill.

Unit Testing: Advanced


I decided to hunker down and get familiar with unit and integration testing a while back, and have finally reached a point where I’m using it with production code. I started off with the base understanding that unit testing’s purpose was to test code, but wasn’t sure in what way. In this post I will give a brief overview of what I setup and helpful tidbits I picked up along the way.

Unit tests are commonly written to ensure a unit of code (ex. class or function)  work as intended. There is also integration tests, which is meant for groups of units or “black box” integration, such as a database where the interface is being tested, and we don’t care about anything beyond that.

Prerequisites

For database integration testing, there is an extra prerequisite, the mySQL database and PDO library.

  • PHP
  • PEAR
  • PHPUnit
  • mySQL
  • PDO Library
PHPUnit uses the PDO library to handle setup and teardown (cleanup) of the database, and other PDO supported databases can be used in place of mySQL. A database is not required if you are not doing database integration.

Setup

File Structure

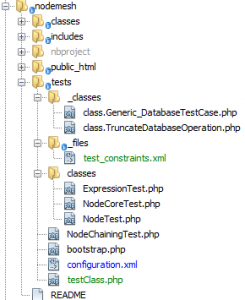
In addition to the basic file structure described in the first installment, there are a few additional parts to the structure.

Folders that contain PHPUnit setup files are prepended with an underscore to separate those from the test files. As you will see, there are two classes folders, one with the underscore and one without. Folders with underscores are used to configure or extend the framework and do not contain any tests.

In addition to the specially named folders, there are two files used for setup: bootstrap.php and configuration.xml.

Bootstrap

The bootstrap runs before the tests, and intended to setup the global environment. This is not to be confused with setting up test specific items that are meant to be sanitized for each tests, that logic should be placed in the setup and teardown functions which will be discussed later.

For my project, I needed to alter the include path and autoload method. Setting the include path was tricky, as they are relative to wherever the unit test is being executed from, and this may vary if your tests don’t all live in a single folder level.

Additionally, my PHP classes have a different file naming convention from the norm. For this reason I added logic in the bootstrap to handle the include paths by using spl_autoload_register. The native function file_exists does not automatically check the include path, so I broke support for the normal naming convention by doing this, but have not run into a problems (yet!).

Note: When overriding __autoload, spl_autoload_register should be used instead.

To tell PHPUnit to use your bootstrap, you must use:
–bootstrap /path/to/bootstrap.php

Configration File

PHPUnit has the ability to load an XML configuration file. Settings in that configuration file are loaded into a global, which can be used to access that data.

Example:

<?xml version="1.0" encoding="UTF-8" ?>
<phpunit>
    <php>
        <var name="DB_DSN" value="mysql:dbname=dbname;host=localhost" />
        <var name="DB_USER" value="dbuser" />
        <var name="DB_PASSWD" value="dbpass" />
        <var name="DB_DBNAME" value="dbname" />
    </php>
</phpunit>

Database Setup

Tests will need a stable database environment to execute predictable tests. While there is some setup needed to get PHPUnit to work with your database, there are some built in functions to return the database back into the state before each test was run.

I used the configuration file to load my database credentials, as shown in the PHPUnit documentation.

Test Setup and Tear Down

In addition to the standard setup and teardown methods, there are additional methods to handle database connections and data cleanup before each test.

The setup/tear down process with a database is a little more complicated then that with PHP objects. Each test should begin and end with a clean slate, therefore truncating the database tables is run before anything else. The truncation is done automatically, however the system needs to know what it’s connecting to, and what it’s touching.

getSetupOperation

There is a caveat with the truncation process with at least mySQL ver 5.5.16 , which is dealing with foreign key constraints. When PHPUnit sends the command to truncate a table, MySQL will have nothing to do with it when the constraints are in place, and the request errors out. Luckily, I was able to find some code that overrides this behavior so that we can move along to the next thing.

getConnection
A method for obtaining a database connection. This can be either a new one or existing. It is here that the settings from configuration.xml are used, as hard coding credentials gets messy.

getDataSet
Now that we have our connection established, the database needs some data to test. getDataSet is intended just for this, and can be used to insert data from a source into the database.

Stubs and Mock Objects

Stubs and Mock objects are useful for testing out variations in input/output, and assuring that methods within a class are being called appropriately.

Definitions taken from PHPUnit:

Stubs – The practice of replacing an object with a test double that (optionally) returns configured return values is refered to as stubbing. You can use a stub to “replace a real component on which the SUT depends so that the test has a control point for the indirect inputs of the SUT. This allows the test to force the SUT down paths it might not otherwise execute”.

Mocking – The practice of replacing an object with a test double that verifies expectations, for instance asserting that a method has been called, is refered to as <em>mocking</em>.

Testing classes that take a parameter during __construct and then run methods on it that require mocking took a couple extra steps to test out. For example, let’s say we have this class:

class Foo {

    public $myVar;

    function __construct($myVar) {

        $this->myVar = $myVar;

        $this->doSomething();

    }

    function doSomething() {

        // Code

    }

}

function testFoo() {
    $stub = $this->getMock('Foo', null, null, true);
    $stub->expects($this->once())
        ->method('doSomething')
       ->will($this->returnValue('foo'));
    $stub->__construct('bar');
}

First, the constructor needed to be disabled, and then mocking of the method needing testing.

Another scenario I ran into was testing out an abstract. An abstract cannot be created by itself, it needs another object to use it and define the abstract functions. PHPUnit allows for the mocking of abstract classes so that “concrete methods” can be tested out.

One last note:

According to PHPUnit documentation: “finalprivate and static methods cannot be stubbed or mocked. They are ignored by PHPUnit’s test double functionality and retain their original behavior.”

However, there is a work around for private/protected methods and attributes.

Conclusion

So there you have it, a brief look at PHPUnit.

Unit Testing: Basics


I decided to get serious with unit/integration testing, and have found the practice to be well worth it. I started off with the base understanding that the purpose of unit testing was to test code, but wasn’t sure in what way. I dove in, and here I am now documenting my findings.

I have broken up this subject into two parts; basic and advanced use. Basic is theory and simple unit testing information, while advanced covers globalized test configuration and setup, and database integration.

In the development life cycle, unit testing can exist before or after coding, depending on which development approach is being taken. Some are in the practice of creating unit tests before they begin generating code for their application, while other models have unit testing as a post-coding task. While the variations of development models is interesting, it falls outside the scope of this post.

Unit tests are commonly written to ensure a unit of code (ex. class or function)  work as intended. There is also integration testing, which is typically done after unit testing, and is meant for grouped units of code or “black box” integration, such as a database where the interface is being tested and not the functions behind that interface.

In addition to ensuring code is working as desired, tests act as documentation, which contributes to the often neglected documentation step of the development life cycle.

Now that we have an understanding as to what these tests are and what they’re meant for, let’s create a test.

Prerequisites

My environment was setup with:

  • PHP
  • PEAR
  • PHPUnit
PHPUnit doesn’t necessarily need to be installed from PEAR, although that is how I did it.

Creating a Test Class

Folder Structure & Naming Conventions

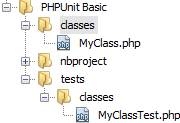
Tests typically reside in a separate folder at the root of the project, this way the files are isolated from the production code base, and it is easy to exclude test files.

File and class names follow a *Test.php naming convention.

For function names, they should either follow test*, or use the @test annotation.

Examples:

public function testNullTypeInConstruct() {
    // Code here
}


/**
* @test
*/
public function functionToTestSomethingElse() {
    // Code here
}

Writing out a descriptive name for each test method makes it easier to keep track of what does what from a glance, especially when using features like testdox, which changes method names into a human readable format.

Skeleton Generator

A “skeleton” test class with can be created automatically based on an existing class by using the skeleton generator. This does not generate all test functions in one shot, but does get you started off on the right foot.

Test Setup and Tear Down

Maintaining a sanitized testing environment is key. PHPUnit includes methods for setting up and removing remnants of  previous tests. The two main methods are named setUp and tearDown.  The names are self-explanatory, setUp runs prior to each test and is intended for initializing variables for each test, while tearDown is for clean up.

Non-global variables are wiped out after each test, so PHP clean up requires little to no effort, as variables are automatically moved into garbage collection and dumped at the end of the script. Only in resource intensive tests should there be any need to consider extra steps in clean up.

Annotation

Annotations can be made to alter the behavior of a test function, such as indicating an exception is expected to be raised in a test. For example, ExpectedExceptions can be noted by annotation or a set function.

Annotations live inside PHP comments. There was an oddity I came across, which is worth noting. I had to use a double asterisk at the beginning of the comment. So I make sure to use /** instead of /* to begin my comments.

Asserting

Here we have the test itself, everything else was the setup. An assertion is a declaration that something should be as defined, or in the case of expected exceptions, it should not be. There are a wide variety of predefined insertions that can be used on booleans, strings, objects and arrays. A full list can be found in the PHPUnit documentation.

Putting It All Together

class MyClass {
    public $foo = 42;
}
require_once dirname(__FILE__) . '/../../classes/MyClass.php';

class MyClassTest extends PHPUnit_Framework_TestCase {
    protected $object;

    protected function setUp() {
        $this->object = new MyClass;
    }

    protected function tearDown() {

    }

    function testFoo() {
        $this->assertEquals($this->object->foo, 42);
    }

}

What’s next?

Here you have information to build a very simple unit tests. Methods can be tested to assure they behave correctly and return expected data regardless of input. In the next post, we take a look at advanced features and working with integration testing.

Shorthand Javascript Techniques


(This is for coders familiar with the JavaScript language. Information on more basic JavaScript usage can be found at sites like w3schools.com.)

Summary

Keeping code standardized can be made easier through JavaScript shorthand. Here we will be looking at several techniques that will make code more readable, flexible and overall easier to matain.

Declarations
Conditions
Mathematic Operations
Anonymous Functions

Declarations

Variables

Instead of declaring each variable individually, they can be placed on the same line with a comma separating them.

var foo1, foo2, foo3, foo4;

Arrays:

var foo_arr = ['bar1',  'bar2',  'bar3', ' bar4'];
window.alert(foo_arr[0]); //bar1

Objects:

var foo_obj = {name:  'bar', some_prop: 'test'};
window.alert(foo_obj.name); //bar

Conditions

condition? true_logic :  false_logic;

Shorthand conditional statements can be coupled with an assignment, allowing  a single line of code to be used for simple conditional logic.

var foo = bar? 1 : 0;

Assigning a default value when encountering an empty variable (null, undefined, 0, false, empty string) can also be shortened from this

if(foo) {
    bar = foo;
} else {
    bar = 'Default Value';
}

to this

bar = foo || 'Default Value';

Mathematic Operations

Handling math operations can be shorted by using the following syntax:

foo = 5;

foo ++; // Increase by one

foo --; //Decrease by one

foo -= 2; //Decrease by two

foo += 2; //Increase by two

foo *= 3; //Multiply by three

foo /= 2; //Divide by two

Anonymous Functions

Assigning a function to a variable:

var my_func = function() { alert('Hello World') }
my_func;

Inline anonymous functions:

var foo = {
    name: 'bar',
    fnc:  function() {
        alert('Hello World');
    }
};

Common Usage

Combining the use of shorthand results in blocks of code that appear more elegant and easier to read.

var foo = [
    {name: 'apple', prop2: 'test2'},
    {name: 'orange', prop2: 'test2'}
];

Instead of:

function fruit(type, cultivar)
{
    this.type= type;
    this.cultivar = cultivar;
}
var foo = Array(
    new fruit('Apple', 'Fuji'),
    new fruit('Apple', 'Gala')
);

As you can see, using shorthand removes “noise” and reduces the amount of written code, both of which make for easier reading. When rummaging through scripts that contain several hundred lines of code, removing any excess code makes life easier.